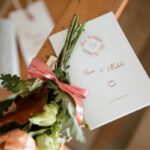
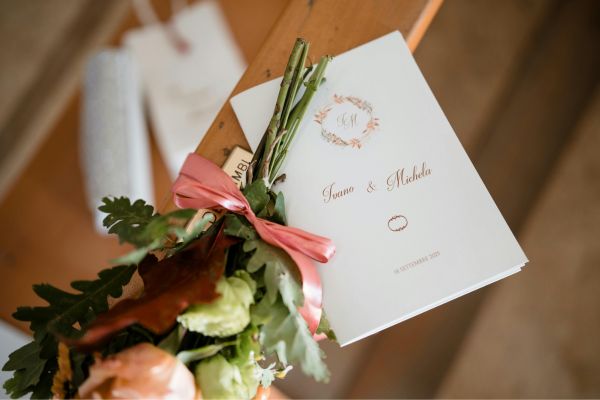
There is something deeply personal about making your own wedding invitations. Long before guests arrive at the ceremony, the invitation gives them their first glimpse of the day you are planning. It hints at the mood, the colors, the level of formality, and sometimes even the personality of the couple. For many people, that is exactly why DIY wedding invitations feel so appealing.
Still, making invitations yourself can also feel a little intimidating at first. Paper sizes, printing choices, envelopes, wording, fonts, trimming, and mailing details all seem simple until you are actually sitting at a table with samples spread everywhere. The good news is that DIY does not have to mean complicated. With the right planning and a few practical diy wedding invitations tips, beginners can create invitations that feel polished, thoughtful, and genuinely personal.
Start With the Mood of the Wedding
Before opening a design app or buying paper, it helps to pause and think about the feeling of the wedding. Is the day going to be formal and elegant, relaxed and rustic, bright and playful, or soft and romantic? The invitation should not feel separate from the celebration. It should feel like the first small piece of it.
A garden wedding might call for botanical drawings, soft greens, and airy spacing. A city wedding may look better with clean typography and a modern layout. A beach wedding could use gentle blues, natural textures, or watercolor details. When the mood is clear, design choices become easier. You stop choosing from endless options and begin choosing what actually fits.
Keep the Design Simple at First
One of the easiest mistakes beginners make is trying to include too many design elements. A border, a floral corner, a script font, a background pattern, a monogram, a ribbon, and a wax seal may all look beautiful separately, but together they can quickly become overwhelming.
A strong DIY invitation usually has one main visual idea. It might be a soft illustration, a beautiful font pairing, a clean color palette, or a textured paper choice. Let that one idea lead the design. Simplicity often feels more elegant, and it also makes the printing process much easier.
White space is not wasted space. It gives the invitation room to breathe. It also helps important details, such as names, dates, and locations, stand out clearly.
Choose Fonts That Are Pretty but Readable
Fonts can completely change the tone of an invitation. A flowing script feels romantic. A classic serif feels formal. A clean sans serif feels modern. But readability matters more than decoration, especially for wedding details guests need to understand quickly.
If you use a decorative script, save it for the couple’s names or a short heading. For the date, venue, time, and address, choose something clear and easy to read. Mixing too many fonts can make the invitation look messy, so two fonts are usually enough. One can bring personality, while the other keeps the information neat.
It is also worth printing a test copy before finalizing anything. Fonts that look lovely on screen can sometimes appear too thin, too small, or too crowded once printed.
Be Careful With Color Choices
Color is one of the most enjoyable parts of creating DIY wedding invitations, but it needs a little restraint. Your invitation colors should connect with the wedding palette, though they do not have to match every detail perfectly. A softer version of your main colors often works better on paper.
Pale blush, sage green, cream, dusty blue, charcoal, terracotta, and champagne tones are popular because they feel gentle and easy to print. Dark backgrounds can look dramatic, but they may require professional printing to avoid faded or uneven results. Very light text on dark paper can also be harder to read.
For beginners, a clean background with colored accents is usually the safest path. It gives you style without creating too many printing challenges.
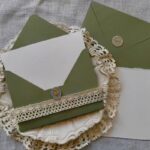
Pick Paper Before You Finalize the Design
Paper affects the entire look of the invitation. A design that looks beautiful on smooth white cardstock may feel completely different on handmade paper, textured ivory stock, or recycled kraft paper. That is why it helps to choose paper early, not at the very end.
Thicker cardstock usually feels more substantial and formal. Matte paper gives a soft, modern finish. Slight texture adds warmth and charm. Glossy paper can work for photo invitations, but it is not always the best choice for classic wedding stationery.
If you plan to print at home, check whether your printer can handle heavier paper. Some home printers jam with thick cardstock, and others may not print evenly on textured paper. Testing one or two sheets first can save a lot of frustration.
Write the Wording Clearly
Beautiful design matters, but wording is the heart of the invitation. Guests need to know who is getting married, when it is happening, where to go, and how to respond. The tone can be formal, casual, traditional, or modern, but clarity should always come first.
A formal invitation might include full names, host names, and traditional phrasing. A relaxed invitation may use warmer, simpler wording. Either approach can work as long as the details are complete and easy to follow.
This is one area where proofreading is essential. Dates, times, venue names, and addresses should be checked more than once. It is also helpful to ask someone else to read the invitation before printing the full batch. A fresh pair of eyes can catch small mistakes you may have missed.
Think About the Full Invitation Suite
The main invitation is only one part of the package. Depending on the wedding, you may also need an RSVP card, details card, accommodation information, directions, dress code notes, or a wedding website line. Not every wedding needs all of these pieces, though.
For a simple celebration, the invitation and RSVP details may be enough. For a destination wedding or multi-day event, extra information cards can keep the main invitation from becoming crowded. A good rule is to give each piece a clear purpose. If one card is trying to explain five different things, the suite may start to feel confusing.
Matching the style across each card creates a more polished look. Use the same fonts, colors, and spacing so everything feels connected.
Print a Sample Before Making the Full Batch
This may be the most important advice for beginners. Always print one complete sample before printing every invitation. Hold it in your hands. Place it inside the envelope. Read it in natural light. Check the spacing, color, font size, and overall feeling.
Sometimes the issue is tiny but important. The text may sit too close to the edge. The color may print duller than expected. The paper may not absorb ink well. The envelope may be slightly too tight. Catching these problems early is much easier than discovering them after printing fifty or a hundred copies.
A sample also helps you decide whether to print at home or use a local print shop. Home printing can work well for simple designs, but professional printing may be better for heavy cardstock, special finishes, or large quantities.
Give Yourself More Time Than You Think
DIY wedding invitations take time, even when the design is simple. There is designing, editing, printing, cutting, assembling, addressing, stamping, and mailing. Each step seems small, but together they can fill several evenings or weekends.
Starting early gives you breathing room. It also makes the process more enjoyable. Instead of rushing through every envelope, you can treat the invitations as part of the wedding experience. Put on music, work in small batches, and let the project feel creative rather than stressful.
Many couples underestimate assembly time. If you are adding ribbons, liners, belly bands, seals, or layered cards, the invitation may look lovely, but each detail adds minutes to every piece.
Do Not Forget Mailing Details
The final invitation should not only look good; it should travel safely. Before mailing the whole set, take one fully assembled invitation to the post office and have it weighed. Extra cards, thick paper, square envelopes, wax seals, and bulky decorations may require additional postage.
It is also wise to mail one invitation to yourself as a test. This shows how it looks after going through the postal system. If the envelope arrives damaged or the seal does not hold, you can adjust before sending the full batch.
Addressing should be neat and consistent. Whether handwritten, printed, or labeled, the outer envelope is part of the guest’s first impression.
Let the Invitation Feel Personal
The charm of DIY wedding invitations is not that they look machine-perfect. It is that they feel connected to the couple. A small drawing of the venue, a favorite color, a meaningful quote, or a handmade texture can make the invitation feel more intimate.
The best diy wedding invitations tips are not about making everything flawless. They are about making thoughtful choices. When the design, wording, paper, and details all work together, the invitation feels intentional. That matters more than expensive finishes or complicated layouts.
Conclusion
DIY wedding invitations can be a beautiful way to bring personality into the earliest part of the celebration. They allow couples to shape the tone of the wedding with their own hands, from the paper they choose to the words their guests will read.
For beginners, the key is to keep the process calm and practical. Start with the mood, choose readable fonts, test your paper, proofread carefully, and give yourself enough time. A handmade invitation does not need to be perfect to be memorable. It simply needs to feel clear, sincere, and true to the day you are creating.